前言
MyBatis是一个流行的ORM框架,它简单易用,支持自定义SQL、存储过程以及高级映射。MyBatis免除了几乎所有的JDBC代码以及设置参数和获取结果集的工作。
作为一款优秀的持久层框架,连接池是必不可少的。本文将分析MyBatis内置的数据源是如何实现连接池功能的(源码基于MyBatis3.4.5)。
JDBC对数据库的操作
回忆一下,我们用原生的JDBC来操作数据库的一般流程:
1
2
3
4
5
6
7
8
9
10
11
12
13
14
15
16
17
18
19
20
21
22
23
24
25
26
27
28
29
30
31
32
33
34
35
36
37
38
39
40
41
42
43
44
45
46
47
48
public class JDBCExample {
    // JDBC driver name and database URL / credentials
    static final String JDBC_DRIVER = "com.mysql.jdbc.Driver";
    static final String DB_URL = "jdbc:mysql://localhost/EMP";
    static final String USER = "username";
    static final String PASS = "password";

    public List<User> queryUsers() {
        Connection conn = null;
        Statement stmt = null;
        ResultSet rs = null;
        List<User> users = new ArrayList<>();
        try {
            // STEP 1: 注册driver
            Class.forName(JDBC_DRIVER);
            // STEP 2: 打开连接
            conn = DriverManager.getConnection(DB_URL,USER,PASS);
            // STEP 3: 执行query
            stmt = conn.createStatement();
            String sql = "SELECT ID, NAME, AGE FROM USER";
            rs = stmt.executeQuery(sql);
            // STEP 4: 获取变量
            while(rs.next()) {
                User user = new User();
                user.setId(rs.getInt("ID"));
                user.setAge(rs.getInt("AGE"));
                user.setName(rs.getString("NAME"));
                users.add(user);
            }
            return users;
        } catch(SQLException | ClassNotFoundException e) {
            e.printStackTrace();
        } finally {
            // STEP 5: 关闭资源
            try {
                if (rs != null)
                    rs.close();
                if (stmt != null)
                    stmt.close();
                if (conn != null)
                    conn.close();
            } catch(SQLException se) {
                se.printStackTrace();
            }
        }
        return users;
    }
}
主要的步骤包括:
- 加载数据库驱动
- 获取数据库连接
- 执行
SQL语句 - 从
ResultSet获取结果,给Entity赋值 - 关闭数据库连接等资源
不难发现,当中包含了大段的重复模版代码。而我们所关心的业务逻辑,只有寥寥几行。而且,每执行一次数据库操作都重新建立一个新的连接,用完之后关闭的做法,性能非常低。因为每次打开关闭连接,都会涉及到TCP的三次握手与四次挥手,以及数据库的验证操作。为了优化第二个问题,出现了数据库连接池。
数据库连接池
不管是Connection Pool,Thread Pool还是Channel Pool,所有池的思想都是一致的:
- 维护一个资源集合
- 消费者可以从集合中获取资源
- 消费者使用完资源后,将之放回池中
当然其中肯定会涉及到一些池的大小的维护,池满之后的处理等细节操作。接下来我们来分析一下MyBatis中的连接池是如何实现的。
MyBatis中的连接池实现
如果我们使用MyBatis内置的数据源的化,一般会在XML配置文件里面这样配置:
1
2
3
4
5
6
<dataSource type="POOLED">
    <property name="driver" value="${driver}"/>
    <property name="url" value="${url}"/>
    <property name="username" value="${username}"/>
    <property name="password" value="${password}"/>
</dataSource>
其中dataSource的type配置为POOLED,则MyBatis会使用org.apache.ibatis.datasource.pooled.PooledDataSource作为数据源。下面是PooledDataSource的类变量:
1
2
3
4
5
6
7
8
9
10
11
12
13
14
15
16
17
// PooledDataSource
public class PooledDataSource implements DataSource {
    // 用来维护连接池的状态
    private final PoolState state = new PoolState(this);
    // 这里用了组合模式,像driver,url,username,password
    // 之类的配置变量信息存在UnpooledDataSource中
    private final UnpooledDataSource dataSource;
    // 连接池的信息,可定制化配置
    protected int poolMaximumActiveConnections = 10;
    protected int poolMaximumIdleConnections = 5;
    protected int poolMaximumCheckoutTime = 20000;
    protected int poolTimeToWait = 20000;
    protected String poolPingQuery = "NO PING QUERY SET";
    protected boolean poolPingEnabled = false;
    protected int poolPingConnectionsNotUsedFor = 0;
    private int expectedConnectionTypeCode;
}
注意,PooledDataSource将一部分配置信息放在了UnpooledDataSource中,并用了一个PoolState来维护连接池的状态:
1
2
3
4
5
6
7
8
9
10
11
12
13
14
15
16
17
18
19
20
21
22
23
24
25
26
27
28
29
30
31
32
33
34
35
36
37
38
39
// UnpooledDataSource
// PooledDataSource可以看成是由UnpooledDataSource扩展而来的,所以复用了一些变量
public class UnpooledDataSource implements DataSource {
    // 包含了如username,password的】等配置信息
    private ClassLoader driverClassLoader;
    private Properties driverProperties;
    private boolean driverInitialized;
    private String driver;
    private String url;
    private String username;
    private String password;
    private boolean autoCommit;
    private Integer defaultTransactionIsolationLevel;
}

// PoolState
public class PoolState {
    protected PooledDataSource dataSource;
    // 空闲连接列表
    protected final List<PooledConnection> idleConnections = new ArrayList<PooledConnection>();
    // 活跃连接列表
    protected final List<PooledConnection> activeConnections = new ArrayList<PooledConnection>();
    // 从连接池中获取连接的次数
    protected long requestCount = 0;
    // 请求连接总耗时(ms)
    protected long accumulatedRequestTime = 0;
    // 连接执行时间总耗时
    protected long accumulatedCheckoutTime = 0;
    // 执行时间超时的连接数
    protected long claimedOverdueConnectionCount = 0;
    // 总共超时时间
    protected long accumulatedCheckoutTimeOfOverdueConnections = 0;
    // 总共等待时间
    protected long accumulatedWaitTime = 0;
    // 等待次数
    protected long hadToWaitCount = 0;
    // 无效连接数
    protected long badConnectionCount = 0;
}
获取连接
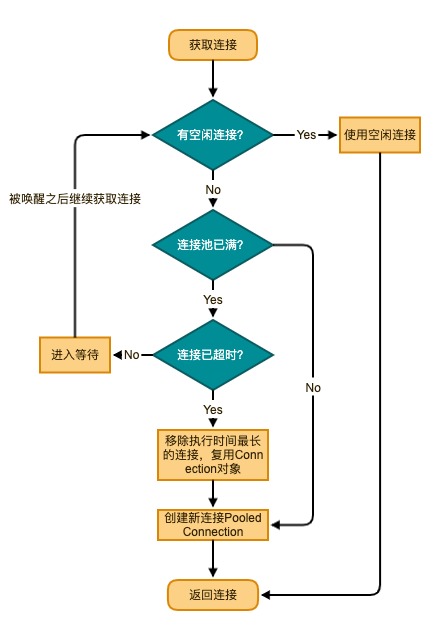
好了,对类的成员变量有了一个直观的概念之后,我们分析来看连接池是如何实现的。找到获取连接的主方法popConnection():
1
2
3
4
5
6
7
8
9
10
11
12
13
14
15
16
17
18
19
20
21
22
23
24
25
26
27
28
29
30
31
32
33
34
35
36
37
38
39
40
41
42
43
44
45
46
47
48
49
50
51
52
53
54
55
56
57
58
59
60
61
62
63
64
65
66
67
68
69
70
71
72
73
74
75
76
77
78
79
80
81
82
83
84
85
86
87
88
89
90
91
92
93
94
95
96
97
98
    // PooledDataSource
    private PooledConnection popConnection(String username, String password) throws SQLException {
        boolean countedWait = false;
        PooledConnection conn = null;
        long t = System.currentTimeMillis();
        int localBadConnectionCount = 0;

        // 需要不断尝试获取连接,所以放在循环里
        while (conn == null) {
            // 为线程安全,加synchronized锁
            synchronized (state) {
                // 检查空间连接列表是不是为空
                if (!state.idleConnections.isEmpty()) {
                    // 如果有空闲连接可用,那么直接获取列表第一个连接并将之从列表中删除
                    conn = state.idleConnections.remove(0);
                } else {
                    // 无空闲连接可用时,走到这里
                    if (state.activeConnections.size() < poolMaximumActiveConnections) {
                        // 如果活跃连接数未超出限制,则新建连接
                        // dataSource.getConnection()的逻辑是初始化driver,从DriverManager获取连接,
                        // 设置autoCommit和IsolationLevel,比较简单,就不分析了
                        conn = new PooledConnection(dataSource.getConnection(), this);
                    } else {
                        // 连接池已满,取出运行时间最长的连接
                        // 列表中的连接是按照运行时间排序的,所以第一个元素就是运行时间最长的
                        PooledConnection oldestActiveConnection = state.activeConnections.get(0);
                        long longestCheckoutTime = oldestActiveConnection.getCheckoutTime();
                        // 如果运行时间超过超时时间
                        if (longestCheckoutTime > poolMaximumCheckoutTime) {
                            // 更新一些统计字段
                            state.claimedOverdueConnectionCount++;
                            state.accumulatedCheckoutTimeOfOverdueConnections += longestCheckoutTime;
                            state.accumulatedCheckoutTime += longestCheckoutTime;
                            // 将超时连接移出 活跃连接列表
                            state.activeConnections.remove(oldestActiveConnection);
                            // 如果未设置自动提交,则进行回滚操作
                            if (!oldestActiveConnection.getRealConnection().getAutoCommit()) {
                                oldestActiveConnection.getRealConnection().rollback();
                            }
                            // 创建一个新的连接,不过需要复用oldestActiveConnection的realConnection,
                            // 实际上并没有创建新的数据库连接
                            conn = new PooledConnection(oldestActiveConnection.getRealConnection(), this);
                            // 复用oldestActiveConnection 的一些信息,将oldestActiveConnection设置为无效
                            conn.setCreatedTimestamp(oldestActiveConnection.getCreatedTimestamp());
                            conn.setLastUsedTimestamp(oldestActiveConnection.getLastUsedTimestamp());
                            oldestActiveConnection.invalidate();
                        } else {
                            // 未超时
                            try {
                                // 记录统计信息
                                if (!countedWait) {
                                    state.hadToWaitCount++;
                                    countedWait = true;
                                }
                                long wt = System.currentTimeMillis();
                                // 调用Object.wait()方法进入等待状态
                                state.wait(poolTimeToWait);
                                // 记录统计信息
                                state.accumulatedWaitTime += System.currentTimeMillis() - wt;
                            } catch (InterruptedException e) {
                                break;
                            }
                        }
                    }
                }
                if (conn != null) {
                    // 检测连接是否有效,主要会检测PooledConnection.valid字段,
                    // 以及执行SQL ping的语句查看数据库状态,这里不做分析
                    if (conn.isValid()) {
                        // 如果没有设置自动回滚,执行回滚操作
                        if (!conn.getRealConnection().getAutoCommit()) {
                            conn.getRealConnection().rollback();
                        }
                        // 更新一些统计字段
                        conn.setConnectionTypeCode(assembleConnectionTypeCode(dataSource.getUrl(), username, password));
                        conn.setCheckoutTimestamp(System.currentTimeMillis());
                        conn.setLastUsedTimestamp(System.currentTimeMillis());
                        state.activeConnections.add(conn);
                        state.requestCount++;
                        state.accumulatedRequestTime += System.currentTimeMillis() - t;
                    } else {
                        // 更新无效连接相关的统计字段
                        state.badConnectionCount++;
                        localBadConnectionCount++;
                        conn = null;
                        if (localBadConnectionCount > (poolMaximumIdleConnections + 3)) {
                            throw new SQLException("PooledDataSource: Could not get a good connection to the database.");
                        }
                    }
                }
            }
        }
        // 如果没有获取到连接,直接抛出异常
        if (conn == null) {
            throw new SQLException("PooledDataSource: Unknown severe error condition.  The connection pool returned a null connection.");
        }
        return conn;
    }
以上就是获取连接的主要逻辑,大致如下:
这里有个疑问,我们外部获取连接用的都是getConnection()方法,而不是popConnection()方法。那么让我们来看看getConnection()是如何实现的:
1
2
3
    public Connection getConnection() throws SQLException {
        return popConnection(dataSource.getUsername(), dataSource.getPassword()).getProxyConnection();
    }
除了调用popConnection()方法之外,还调用了getProxyConnection(),看名字是包装了一层代理。为什么要这样做呢?这就需要看释放连接的逻辑了。
释放连接
MyBatis用代理模式(如果对此模式不了解的,推荐看一下这篇文章),将数据库连接包装在PooledConnection对象之中:
1
2
3
4
5
6
7
8
9
10
11
12
13
14
15
16
17
18
19
20
21
22
23
24
25
26
27
28
29
30
31
32
33
34
35
// PooledConnection
class PooledConnection implements InvocationHandler {
    // 关闭连接的方法close(),在代理中拦截此方法来做释放连接的操作
    private static final String CLOSE = "close";
    private static final Class<?>[] IFACES = new Class<?>[] { Connection.class };
    private final int hashCode;
    // 数据源对象,这里即PooledDataSource
    private final PooledDataSource dataSource;
    // 真正的从DriverManager中获取出来的连接
    private final Connection realConnection;
    // realConnection的代理对象
    private final Connection proxyConnection;
    // 一些参数
    private long checkoutTimestamp;
    private long createdTimestamp;
    private long lastUsedTimestamp;
    private int connectionTypeCode;
    private boolean valid;

    // 构造方法
    public PooledConnection(Connection connection, PooledDataSource dataSource) {
        this.hashCode = connection.hashCode();
        this.realConnection = connection;
        this.dataSource = dataSource;
        this.createdTimestamp = System.currentTimeMillis();
        this.lastUsedTimestamp = System.currentTimeMillis();
        this.valid = true;
        // proxyConnection使用了JDK的动态代理,并将自己(this)作为了InvocationHandler
        this.proxyConnection = (Connection) Proxy.newProxyInstance(Connection.class.getClassLoader(), IFACES, this);
    }

    public Connection getProxyConnection() {
        return proxyConnection;
    }
}
注意最后的getProxyConnection()方法,发现它果然返回了一个Connection的代理对象。同时,由于PooledConnection实现了InvocationHandler接口,当外部调用代理对象方法时,都会转为调用InvocationHandler.invoke()方法。于是下面主要看invoke()方法是如何实现的:
1
2
3
4
5
6
7
8
9
10
11
12
13
14
15
16
17
// PooledConnection
public Object invoke(Object proxy, Method method, Object[] args) throws Throwable {
    String methodName = method.getName();
    // 如果调用了close()方法,即调用方需要关闭连接
    if (CLOSE.hashCode() == methodName.hashCode() && CLOSE.equals(methodName)) {
        // 转为调用pushConnection()方法
        dataSource.pushConnection(this);
        return null;
    } else {
        try {
            // 如果不是调用的close()方法,则调用realConnection的同名方法
            return method.invoke(realConnection, args);
        } catch (Throwable t) {
            throw ExceptionUtil.unwrapThrowable(t);
        }
    }
}
看到这里,出现了闭环。调用方使用完连接之后,如果调用了close()方法,会被上述方法拦截,转为调用dataSource.pushConnection(this)方法,猜测这个方法是用来将连接放回连接池中的。我们来一探究竟:
1
2
3
4
5
6
7
8
9
10
11
12
13
14
15
16
17
18
19
20
21
22
23
24
25
26
27
28
29
30
31
32
33
34
35
36
37
38
39
40
// PooledDataSource
protected void pushConnection(PooledConnection conn) throws SQLException {
    // 与popConnection方法一样,同样也在state上加锁,用来做线程间协作
    synchronized (state) {
        // 从活跃连接中移除此连接
        state.activeConnections.remove(conn);
        if (conn.isValid()) {
            // 空闲连接未满
            if (state.idleConnections.size() < poolMaximumIdleConnections && conn.getConnectionTypeCode() == expectedConnectionTypeCode) {
                state.accumulatedCheckoutTime += conn.getCheckoutTime();
                // 若未设置autoCommit,执行回滚
                if (!conn.getRealConnection().getAutoCommit()) {
                    conn.getRealConnection().rollback();
                }
                // 创建新的PooledConnection,并加入到idleConnections列表的末尾
                PooledConnection newConn = new PooledConnection(conn.getRealConnection(), this);
                state.idleConnections.add(newConn);
                // 复用原连接的时间信息
                newConn.setCreatedTimestamp(conn.getCreatedTimestamp());
                newConn.setLastUsedTimestamp(conn.getLastUsedTimestamp());
                // 将原连接置为无效状态
                conn.invalidate();
                // 唤醒等待连接的线程
                state.notifyAll();
            } else {
                // 空闲连接集合已满
                state.accumulatedCheckoutTime += conn.getCheckoutTime();
                // 回滚未提交的事务
                if (!conn.getRealConnection().getAutoCommit()) {
                    conn.getRealConnection().rollback();
                }
                // 直接将数据库连接关闭
                conn.getRealConnection().close();
                conn.invalidate();
            }
        } else {
            state.badConnectionCount++;
        }
    }
}
pushConnection()逻辑比较简单,主要做了两件事情:
- 将连接从活跃连接列表移除
- 如果空闲列表已满,则直接将此连接关闭;如果空闲列表未满,则新建
PooledConnection并复用Connection对象(所以并没有新的TCP握手挥手的开销),并将此连接放入空闲列表。
到此,PooledDataSource的获取连接与释放连接的操作,在连接池中形成了一个闭环。
总结
本文分析了MyBatis内置的连接池的实现方式。当调用方拿连接时,首先会从池中获取。当调用方关闭连接时,MyBatis使用了代理模式拦截此方法,将该连接放回到池中。